Saturday, July 07, 2007

Challah

It's been a while since i posted here. It doesn't mean i haven't cooked all this time, or tried out new things. It's just life has this weird tendency of getting hectic and certain things are left behind. Updating this blog was one of them :) Sorry.

Trying to revive this habit, i am posting today about making a challah. It actually works out well for many friends asked me to share a recipe for some Jewish food and this one is probably among the few that are traditionally Jewish.

Before i start, i have to confess that while making the challah i cheat. I am using a breadmaker to make the dough. I believe you can do it without using technology, but i confess it makes the life much easier. In fact, breadmaker was probably one of the best pieces of kitchenware i've ever got. Hopefully i will share some interesting bread recipes in the future.

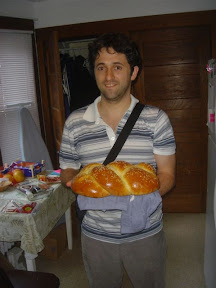
The recipe i used for challah offers two versions of quantities - for a regular challah and for a large one. Yesterday i made a large one (on the first picture), but today i divided the dough in two parts and am trying to make two smaller challahs instead of a large one. So, for the breadmaker version of the dough for a large challah you need:
  • 2 eggs (room temperature) + water to equal the whole thing 1.5 cups of liquids
  • 1/4 cup of oil ( i am using olive)
  • 4.5 cups of bread flour (in case you've never baked bread, it is different from an all pupose flour and it is apparently important)
  • 2 TBL of sugar
  • 2 tsp of salt (i am using sea salt which is larger than the regular table salt)
  • 1.25 tsp of bread machine yeast or 2 tsp of active dry yeast
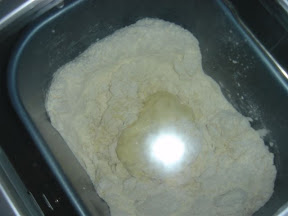
Now, a couple of things i learned working with the breadmaker (skip it if you have the experience). First, it is a good practice to add a little bit less flour than the recipe suggests. Theoretically you can add more in the process (providing you are monitoring the process), but i never had to do it yet. At the same time i saw results of adding too much flour and trust me, it wasn't good. Another thing is about order of putting the things together into the machine - first you put in liquids, then everything else with the yeast very last. Basically, the order i put things in is the order i listed them. And finally, a method of adding yeast that i learned from a RU booklet on breadmaking i got from my sister. You simply make small halls in the flour and other dry ingredients, and then pour the yeast there. It works.

In the breadmaker i have it takes about and hour and 20 minutes for the dough to be ready. From my end it takes 5 minutes to put all the ingredients together and the come back after 1 hour and 20 minutes and have a ready dough.


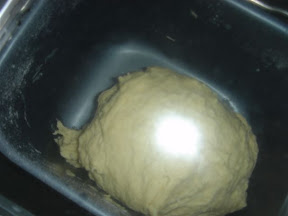
The machine knits it, lets it rest, knits it again, etc. I believe the hand process is a bit different, but i guess it is close enough.


After the dough was ready i divided it in two halves (one for each challah) and then each one was divided in three (the original recipe suggest dividing the whole amount in three and then making one huge challah).


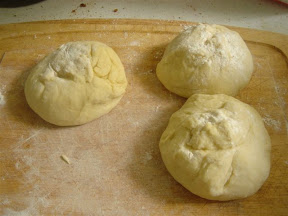
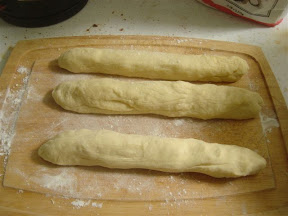
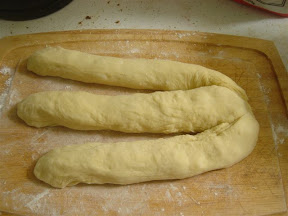
Then i each one of the small balls was made into a rope, 2-3 cm in diameter (about 4 cm for the large challah) and 20 cm long (a bit longer for the huge one).


The next step is braiding the three ropes together. For that purpose you have to pinch them on the one side, braid, and then pinch on the other.


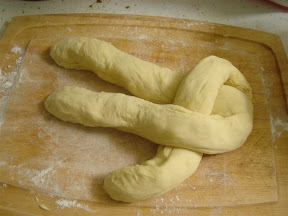
The final result should be something like this.


Next you place the challah/s on greased baking sheet, cover it with a towel and let it rest in a warm place for about an hour.


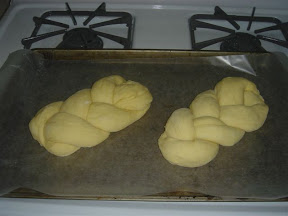
During this time the challahs are supposed to rise and practically double themselves in size. This what my challahs looked after almost an hour.


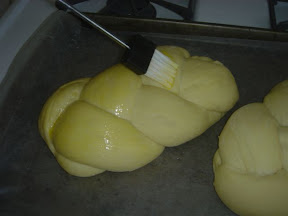
At the next stage you heat the stove to 350F/177C. While it is heating you are taking on egg yolk (the original recipe says 2, but i think 1 is enough) and beat it with 1 TBL of water. Then you brush it onto the challahs and as a final touch sprinkle some sesame or poppy seeds on the top of it.


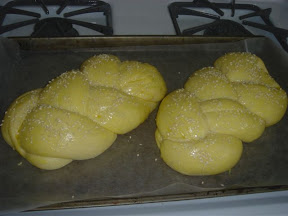
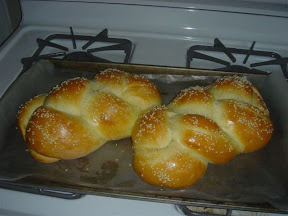
When everything is ready, you send the challahs into the stove for about 20 minutes (25 minutes for the huge challah). I test if its done by sticking a toothpick and seeing if it comes out dry.


That's basically it... Enjoy the challah, from my experience it turns out really great. Try it with Nutella or other chocolate... it is good!

Sunday, October 16, 2005

Getting started - "Quick and easy Pakistani dish".


This is the first one. Thank you Farah for sending it and for explaining about roti! Here is the original recipe as Farah sent it:

“Ok recipe, chop and onion and sort of shallow fry it not too much oil wait till they get a bit pink and soft and slightly golden, chop a tomato and add it with onions and it cook it a bit (you can use tomato paste if you like, but fresh tomatoes taste better in this i think) than add chicken to it on a slow heat and mix them all, let it cook for a while. If mixture starts sticking to the pan than add a bit of water but before you do that add some spices, salt, black pepper/red pepper, add capsicum that tastes good and some green herbs, and squeeze a lemon as well. Add a bit of garlic as well.
Let it cook for a while on slow heat with covered pot until the chicken is all soft etc :) that’s pretty much it :) see how simple don't add too much water because we are not making a gravy just add enough to avoid it from burning and allow chicken to cook.
If you can peel tomatoes somehow that would be cool, because you do sometimes have tomato skins separated during cooking I don't really like that.
you can peel a tomato, put it on a baking try, sprinkle a bit of oil on it and put it in oven for a bit and just check when it starts getting all soft, you can take it out and peel off the skin, same goes for garlic.”


After reading the recipe I realized that I would like to have script for entire meal. I don’t think having Pakistani style chicken with fries is making the experience richer. I was thinking of making it with rice, but preferred checking with Farah who told me about roti. Being almost as lazy as I am, she sent me this link to a recipe of roti.

Interestingly enough, while we talking about roti, we discovered that it is very similar to what is known in Israel as lafa or pita iraqit (Iraqi pita bread), which are apparently known in Pakistan as kabuli naan (kabuli=afghan and naan=a bit bigger and thicker roti --- thanks Farah). Excitement from the discovery lead to searching a bit of Wikipedia. This revealed an interesting similarity. There is an entire family of flatbreads. They exist in Norway, throughout the Asia and also in Mexico and vary a little bit. However the binding principle seems to be the same – simplicity.

Anyhow, having the guidelines I approached the adventure. Although the roti idea was very young (and frankly I had this thought of simply replacing it with lafa :) I started with making the dough. This is because the dough has to wait for about half an hour, which is more than enough for preparing everything else. I went for smaller amounts than those in the recipe for it was supposed to be a meal for three. Following ‘sophisticated’ mathematical calculations I ended up with mixing about 1/3 of a cup of wheat flour and 1/3 cup of cake flour. This required almost a full cup of water to mix and few minutes of fun playing with the dough.

Leaving the dough to rest under a damp dishcloth I moved to the main course. Here I started with cutting 400g of chicken breast and chopping one onion, two tomatoes and some garlic (my family loves garlic so I took Farah’s advice of adding “a bit of garlic” to a certain extreme :). Here I would like to suggest another way of peeling tomatoes, which I think is a bit easier from what Farah suggests. Simply put your tomatoes into a bowl and pour some boiling water on it. You can even leave the tomatoes in the hot water for a minute or so. After that, the skin gets off easily.

The next step was about spices. Here I have to admit is one of my weak spots. I don’t know many spices (though willing to try) and I hesitate a bit with using them in right quantities. So, except for having black pepper, salt and two kinds of capsicum (sweet and hot) I wasn’t really prepared with spices, particularly with the “green herbs” part. So, I looked for whatever is left from previous cooking experiments and ended up with adding, together with pepper and salt, sweet capsicum, a little bit of hot capsicum, dried basil, dried parsley, dried tarragon and of course lemon. The method I used is adding a bit of a spicy and smelling the dish. As long as it smelled nice I would add another. The problem with applying this system to this dish was a very strong smell of tomatoes, which more or less took over all other smells. Maybe it was a sign for me to be braver with spices, but at the end I think there was more room to improvise with spices. I hope to learn this as time passes.


So here we were with the meat and co. boiling (there was no need to add any water, juices from tomatoes and meet were more than enough) and I approached the final stage of making roti… That was fun!!! Dividing the dough in four I simply rolled them out (you can see they were even measured, but that was for fun :) and put one by one on a simplest hot frying pan. After less than a minute you turn it over, few more seconds and nice hot, fresh roti is ready. I think it is amazing how simple flour and some water are actually becoming bread.

The order of things (roti-meat-roti) proved to be right and at the finish line everything was ready and hot. I also quickly chopped a very basic green salad (onion, cucumbers, dill and lettuce) dressed with some olive oil and balsam vinegar, and here we go – lunch is served :) Well, we also added some wine, even though I don’t want it was originally intended in Pakistan, but we tend to have wine during the lunch time + it was Saturday after all.

Roti has became the high light of the meal mostly, I think, due to the fun of eating it. The meat was very soft and had rather gentle and yet spicy taste. I really think I could go further with improvising with spices, it wouldn’t spoil it. My mother explained that she is preparing a similar dish based on meat and vegetables, but it has a different taste. I would say that the East-European version is a bit heavier and less sophisticated in terms of spices. I think the main difference is in climate. While Eastern-Europe is cooler and someone may say have a severer weather, the climate in Pakistan is much warmer (probably more like what we have in Israel). If anyone would be interested, I could experiment with making that as well and share more details.

Also, we didn’t really know how everything should be consumed together, so there were different attempts starting from putting the meat and the salad on the roti and till eating the meat and the roti separately. This I think is another point to pay attention to in the next journey – figure out more about the meal itself (what is going together with it in terms of side dishes, drinks and maybe even music where appropriate). Anyway, dipping roti in the sauce created by tomatoes and meat proved to be very tasty :) I was trying to imagine what it would feel like actually eating it in Pakistan…

To sum up it was very easy and quick to make. Thank you Farah for sharing a bit of Pakistan with me. I saw the new recipes you sent and will try them out soon. However, the next journey will be to Sri-Lanka. Michelle sent me some recipes, which I’ll try out soon.

In the meantime comments are welcome and if you try making the dish, please let me know how it was. Thank you again Farah! And bon appetite everyone! :)